To adjust a recumbent bike for comfort and efficiency, you must test and fine-tune the adjustments according to your personal comfort. These include the seat, backrest, pedals and foot straps, monitor and resistance levels.
For as long as you know how to adjust a recumbent bike for optimal comfort, you shouldn’t feel much strain on your back, joints and knees.
In this article, we will guide how to adjust a recumbent bike for optimal comfort.

1. Align the Seat
The proper position of your bike seat greatly depends on how tall and how long your legs are. It’s a good thing that recumbent bikes have a lot of adjustments to provide optimal sitting comfort during your workout.
Make sure that your back is securely against the back support. Then, move your right or left foot to the farthest point of the pedalling cycle.
Your knee should be a little bent to know if it is the right seat position for you. Make sure that your knee is not too low to prevent knee pain or injury. Your bike seat is too far for you if your knee is too straight. Adjust your seat forward or backward to ensure that your legs are in the proper position.
You will know if your position is correct when you start to cycle. Discomfort on your legs, back and knee only means you have not adjusted your seat properly.
2. Position the Backrest
Adjusting the backrest of your recumbent bike can provide lumbar support for maximum comfort and spinal alignment. That is why it is an ideal exercise bike option for people with lower back injuries.
According to a study published by the University of North Texas in 1990, 135 degrees to 150 degrees seat back angles of a recumbent bike can enhance efficiency, lessen physical stress, boost seat comfort, and reduce perceptions of exertion.
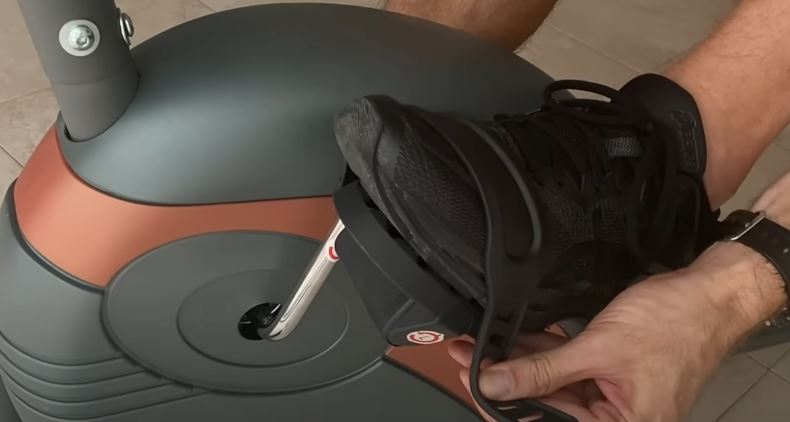
3. Adjust the Pedals and Foot Straps
Some people forget about the importance of pedal and foot strap adjustment. These basic components ensure that your bike workout is safe and in proper form. Recumbent bikes come with foot pedals and adjustable foot straps to make your feet secure during your ride.
The front half of your foot should be positioned on the pedal and the foot strap must be tight over your foot. Do not make the straps too tight because it can affect the blood supply to your feet while working out. However, straps that are too loose are also not recommended because your feet may slip out of the pedals and cause injury.
Adjusting the pedal and foot strap properly will help boost your efficiency and performance during training.
4. Align the Handlebars
The ideal handlebars should be placed in a high position. Placing it too low will result in neck, back and shoulder pain as a result of the poor placement. Try to play around with setting up the handlebar until you are totally comfortable. Do not place too much weight on the handlebar and ensure that your elbows are a bit bent when holding it. Your arms should stretch at shoulder level when grasping the handlebar to give you a comfortable hand grip and wrist alignment.
5. Position the Monitor and Control Panel
Having a display monitor for your recumbent bike is important; you can track down specific information such as distance, speed and resistance while training. It is recommended to adjust your monitor and control panel for better visibility and convenience.
Placing it too low or too high may hurt your neck or back that is why it is very important to adjust the angle and height of the monitor for easy viewing during workouts.
6. Add a Seat Cushion for Support
A recumbent bike has a larger seat compared to other exercise bikes. However, sitting too long on an exercise bike may result in butt pain. Adding a seat cushion or pillow on your recumbent bike will enhance comfort during your workout.
7. Adjust the Resistance Levels
How much resistance you need for training will vary on the type of exercise you are going to do and your long-term fitness goals. Increasing the resistance is best if you want a more challenging workout. However, upping the resistance will slow you down.
Lower your resistance if you want a fast-paced workout session or increase it if you want to build and tone your muscles more. If you want to burn more calories in a short period, try doing HIIT workouts. This exercise is a great way to navigate the resistance knob and challenge yourself to advance your fitness competence. However, if you are a newbie at cycling, then start with no resistance before you gradually increase it.
Why the Need to Test and Fine-Tune?
It may take some time to fully adjust your bike according to your comfort and efficiency. Test it several times and make sure you make some adjustments and make further tweaks if necessary when you feel any discomfort. Take short rides first as you adjust your bike until you get the best bike position.

Other Questions About Recumbent Bikes
1. How can you make your recumbent bike seat more comfortable?
You can make your recumbent bike seat more comfortable by adjusting your seat properly, taking the correct riding position, using cushioned cycling shorts, adding a seat cushion or pillow, or replacing the saddle itself.
2. How long should you ride a recumbent bike every day?
You should ride a recumbent bike for at least thirty minutes daily. You might want to pedal longer to get the most benefits from riding a recumbent bike. 60 minutes to 90 minutes of cardiovascular workout, five days per week will help you lose weight faster.
- How Long Should You Stay in a Sauna Safely? - 20 January 2024
- Boost Post-Workout Recovery: Benefits of Using a Sauna for Recovery - 19 January 2024
- Discover the Health Benefits of a Low EMF Infrared Sauna - 19 January 2024